
Watercolors for Illustrators
Sandra Mejia · Illustrator + Pattern Designer
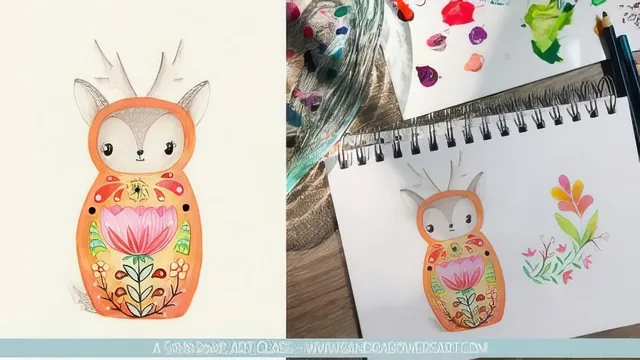
A tight 34-minute demo of controlled watercolor icon painting, built for illustrators who already know the medium but want a cleaner, more graphic look.
A narrow, well-demonstrated technique
Watercolors for Illustrators is not a survey of watercolor painting. It is a demonstration of one specific approach: painting graphic icons and illustrations with a controlled, layered method rather than the loose, color-bleeding style most watercolor tutorials favor. Sandra Mejia, an illustrator and surface pattern designer, frames the whole class around two techniques, wet-on-dry and wet-on-wet, and spends nearly all eleven lessons showing how she uses the first to build shape and shadow with precision.
The wet-on-dry method is the backbone of the class. Layers of paint are added one at a time, always letting the previous layer dry before the next goes on, with shadows built up gradually on the borders of a shape rather than blocked in all at once. Edges get softened with a dry brush or a dab of paper towel, never scraped, which keeps the linework crisp instead of muddy. This is contrasted against wet-on-wet, where water is laid down first and pigment is dropped in to spread on its own, useful for flowers or backgrounds but treated here as the secondary tool.
Before any actual painting begins, there is a short but genuinely useful run of brush-control drills: corners, straight and diagonal lines, circles, leaf shapes with veins, and pressure exercises to practice thick and thin strokes with the same brush. These are simple, almost childlike exercises, but they do the real job of teaching how a brush behaves under different amounts of pressure and water, which pays off directly once painting starts.
Where the class delivers and where it thins out
The core project, painting a nesting doll icon alongside a small flower, walks through the full arc of a finished piece: pencil sketch transferred with a light box, a light base wash, shadows built patiently in layers, black ink details added with a pen nib or Micron pen, and white ink highlights applied last to make the piece pop. Watching that full sequence, including small real-world moments like correcting a smudge or working on multiple shapes at once so nothing sits idle while drying, gives a clear and honest picture of an actual working process rather than a polished, edited-down version of one.
Where it falls short is depth. Supplies are named quickly (cold press paper, a few brush sizes, liquid over pan or tube watercolors) but the reasoning behind color mixing and palette planning gets only a passing mention. Beginners hoping for guidance on water ratios, paper stretching, or basic color theory will find little support here, since the class assumes a working knowledge of watercolor already and moves straight into a specific stylistic method. At 34 minutes total, it is also short enough that anyone wanting extended practice time or multiple full projects will need to look elsewhere.
What it does well is stay focused. There is no padding, no long personal narrative, and no attempt to cover every watercolor technique that exists. It teaches one clean, repeatable process for turning a rough sketch into a finished graphic icon, and it shows that process from start to finish without skipping the fiddly middle parts most tutorials gloss over.
The standout
The layered wet-on-dry shading demonstration, where progressively darker washes are built up and edge-softened with a dry brush, is the one technique worth the whole class.
What you will learn
- The difference between wet-on-dry (controlled, layered shading) and wet-on-wet (unpredictable blending) and when to use each
- How to build shadows gradually with successive darker layers, softening edges with a dry brush or paper towel instead of blending wet-in-wet
- A set of brush-control warm-up exercises (corners, spirals, leaf shapes, thick-to-thin pressure strokes) for steadier line work
- How to sequence a finished piece: pencil sketch transferred via light box, base wash, layered shadows, black ink details, then white ink highlights
- How to add fine black details with a pen nib or Micron pen without outlining every shape and flattening the painting
- How to mix and log a custom liquid watercolor palette so specific colors can be reproduced across future paintings
Best for: Illustrators and pattern designers who already handle a paintbrush comfortably and want to tighten up loose watercolor work into crisp, controlled icons.
Skip it if: Complete beginners to watercolor who need guidance on paper stretching, water-to-pigment ratios, or basic materials from scratch.