
Embroidery on Photographs with 10 Simple Stitches
Peggy Dean · Top Teacher | The Pigeon Letters
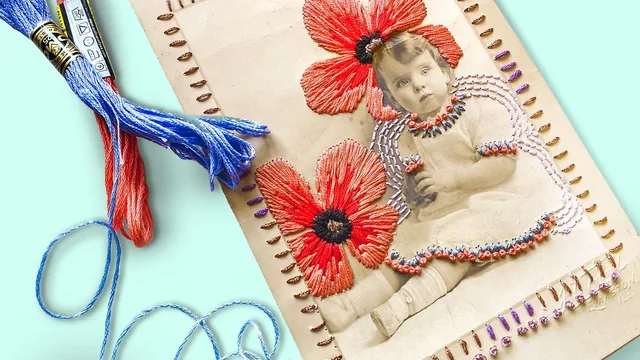
A charming, well-taught niche technique, but 108 minutes of loosely structured demonstration teach the stitches faster than the discipline of working on paper.
Peggy Dean's class sits at the intersection of two crafts: hand embroidery and photo collage. The premise is simple and appealing. Take an old photograph, usually a thrifted or public-domain vintage print, and stitch directly into the paper to add color, texture, or an invented object that was never in the frame. The course walks through that idea from sourcing to finished piece across fourteen short lessons, and the niche is strong enough to carry the runtime even when the teaching gets loose.
Structure and technique
The stitch instruction is the backbone, and it is the most useful stretch of the course. Ten stitches get demonstrated, including running stitch, cross stitch, satin stitch, blanket stitch, the French knot, and fly stitch, each shown first on ordinary fabric in a hoop before the class pivots to paper. That pivot matters, because paper behaves nothing like fabric. A needle can only pass through a hole once. Two punctures placed too close together will tear. The class addresses this directly by introducing a pre-punching method: using a dense foam pad (or a sponge in a pinch) to poke every hole in the photograph before any thread goes in, so the stitching pass becomes a matter of following existing holes rather than fighting the paper. That single technique, along with the reminder to use only thin, fine-gauge needles, is worth more than the ten-stitch list itself, since it is the difference between a piece that survives handling and one that rips apart mid-project.
The photo-sourcing lesson is a genuine bonus most embroidery classes skip. It walks through browsing Flickr Commons for public-domain vintage images, distinguishing them from copyrighted modern uploads, and evaluating a photograph for negative space, subject pose, and where thread could plausibly go. It is practical and specific, down to a recommended paper stock for anyone printing sourced images at home.
Where it thins out
The color and design lessons are more reflective than instructional. Peggy talks through her own past pieces, explaining after the fact why a rainbow burst was muted rather than bold, or why a palette drifted toward pink, but there is no exercise or framework a viewer can apply independently beyond general color-wheel vocabulary like complementary and analogous. The three demonstrated styles (mark-making bursts, dense color fill, and outlining architectural lines) are shown as live, semi-improvised sessions rather than planned projects, which is charming but light on repeatable process. Viewers who want to know exactly how many holes to space per inch, or how many strands to use for a given fill density, will have to infer it from watching rather than being told outright.
The tone throughout is casual to a fault. Digressions about unraveling thread, dad jokes, and self-deprecating asides about not being a "real" fiber artist are consistent with Peggy Dean's teaching style, but they pad a runtime that could deliver its actual technique content in under an hour. For someone who already sews or embroiders, that looseness is a minor cost against a genuinely fresh application of familiar skills. For a total beginner hoping for a structured, step-counted introduction, the same looseness will feel like missing instruction.
The standout
The pre-punching technique with a dense foam pad, paired with the one-pass-through-per-hole rule, is the single piece of information that prevents a photograph from tearing and makes the whole project viable.
What you will learn
- Ten hand embroidery stitches (running, cross, satin, blanket, French knot, fly, and others) demonstrated first on fabric, then adapted to paper
- How to prep a photograph for stitching by pre-punching holes with a dense foam pad before threading
- How to source copyright-free vintage photographs using Flickr Commons and evaluate images for embroiderable space
- How to separate embroidery floss strands and rethread doubled strands through a fine needle without shredding paper
- Three distinct embroidery-on-photo styles: mark-making with bursts of thread, dense color fill, and outlining architectural lines
- How to build a limited color palette using complementary, analogous, and monochromatic relationships
Best for: Crafters who already know basic embroidery or paper crafting and want a low-commitment way to combine the two into a mixed-media keepsake or gift.
Skip it if: Total beginners who need stitch diagrams, precise stitch counts, or a structured pattern to follow rather than an artist thinking aloud through her own choices.