
DSLR Photography II: Understanding Lenses, Focal Length & Shooting
Photo Essentials x Justin Bridges
A working New York fashion photographer walks through his actual lens bag, showing exactly why a 50mm flatters faces and a 16mm distorts them.
This is a lens course built by a working photographer, not a camera-store clerk, and that distinction shows in the choices it makes. Justin Bridges frames the entire class around one idea: the lens matters as much as the camera body, and most photographers never learn to choose one deliberately. Rather than lecturing about optics, he walks outside and through a studio with a bag of primes and zooms, testing each one against a real subject.
Structure and the core demo
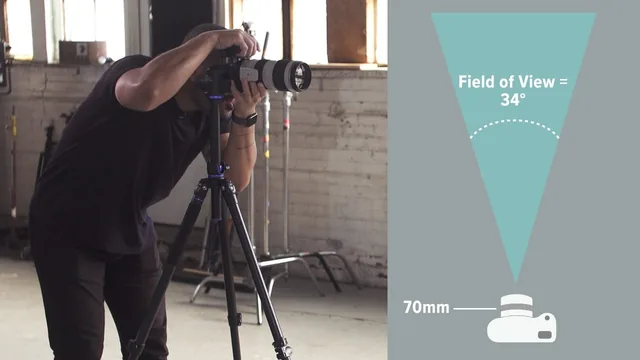
The course opens with a genuinely useful anatomy lesson, naming the parts of a lens (focus rings, image stabilization switch, aperture range) in plain terms before getting to the concept that actually matters: focal length and field of view. The standout sequence locks a camera on a tripod and fires the same scene at 24mm, 50mm, and 70mm, then repeats the exercise on a 70-200mm zoom. Watching the frame tighten while every other setting holds constant does more to teach focal length than any diagram could. The crop-factor explanation that follows is equally concrete: a 35mm lens on a full-frame body becomes roughly 53mm on a Canon APS-C sensor, and that single worked example clarifies a concept that trips up a lot of intermediate shooters.
Four genres, four lens strategies
The deep-dive lessons are where the course earns its runtime. Portraits get the most rigorous treatment: the same face is shot at 200mm, 100mm, and down to a wide angle, showing how longer focal lengths flatten features while wide lenses stretch them, with 50-85mm marked as the flattering middle ground. The object photography section pivots to a 100mm macro lens on a watch, using it to explain when to stop down to f/18-f/22 for full product detail versus opening up for a shallow product hero shot. Street photography gets a genuinely practical breakdown of stealth versus reach, contrasting a 35mm shot from the hip against a 70-200mm used to catch a subject from across the street without them noticing. Landscape work closes the demo out with a 16-35mm lens at golden hour, including the aperture and shutter logic for water that reads smooth rather than choppy.
The editing lesson is a smart inclusion rather than a bolted-on afterthought. It ties directly back to the distortion and vignetting problems introduced earlier, showing how Lightroom's lens-profile correction fixes both, then moves into a tone curve S-curve for contrast and the upright tool for straightening a skyline. Tying the fix back to the flaw it's fixing is good teaching sequencing.
Where it comes up short
The course assumes a viewer who already understands aperture, shutter speed, and ISO, and it says so directly, pointing newcomers toward a companion fundamentals class rather than re-teaching exposure here. That's a reasonable scope decision but it does mean the class offers little to a true beginner. The buying-tips bonus lesson is useful but thin, covering mount compatibility and weight without much on how to evaluate used glass or read an MTF chart. And because the entire course is built around one shooter's personal kit of Canon L-series glass, some of the specific lens recommendations skew toward gear a hobbyist may never own, even though the underlying focal-length logic transfers to any brand.
What holds together well is the throughline: focal length choice is a creative decision, not just a technical spec, and the course proves that claim with real side-by-side comparisons rather than assertions. For an intermediate shooter who owns a couple of lenses and has never thought hard about when to use which, that reframing alone is worth the hour.
The standout
The side-by-side portrait demo, shooting the same framing at 200mm down to 16mm, makes the abstract idea of lens compression versus distortion instantly visible and impossible to forget.
What you will learn
- How focal length changes field of view and facial proportion, demonstrated on the same subject at 16mm through 200mm
- How to match a lens to a genre: 50-85mm for portraits, 100mm macro for product detail, 16-35mm for landscapes, 70-200mm for street and wildlife distance
- How sensor size and crop factor change effective focal length, including the math for converting a full-frame focal length to APS-C
- How to correct barrel distortion, vignetting, and crooked horizons in Lightroom using lens profiles and the upright transform tool
- How to build contrast with a tone curve S-curve instead of a blanket contrast slider
- What to weigh when buying a lens: mount compatibility, weight, and build quality versus image quality trade-offs
Best for: A photographer who already knows exposure basics and now wants a practical framework for choosing which lens to grab for a given subject.
Skip it if: A total beginner who hasn't yet learned the exposure triangle, or anyone shooting on a phone or a lens-less camera system.